


The Polar Cloud replaces your object storage, your host, your slicer, and more.
Jump to a topic:
Printer Dashboard
Once you connect your printer, you can view it any time from the Homepage or by navigating to Make > Printers. Clicking on your printer brings you to the PRINTER DASHBOARD.
The Printer Dashboard displays all the info you need to use your printer. Check out the image and list below for a detailed description of the different parts of the dashboard.

Print Queue: Beneath the printer’s camera feed, you’ll see jobs that have been sent to the printer. If you’ve shared your printer with others, they can send jobs to the printer as well (depending on their level of access). The first job (the leftmost job) is first in queue. See the “Printer’s Queue” section further down the page for more info.
Printer Status: Here the printer tells you if it’s idle, printing, waiting for you to clear the last print, or any other status your printer has.
Print Details: Time elapsed, time remaining, percentage completed.
Temperatures: Nozzle 1, Nozzle 2 (if applicable), the Heated Bed, and Chamber temperature are displayed here, underneath the start button.
CANVAS: The advanced-feature slicer available to accounts with an active subscription.
G-Code Job: An upload dialog box that allows you to bypass the built in slicer (#7) and upload a job that you’ve already sliced. Be careful! GCode is machine specific and has to be prepared for the specific printer you’re using.
Build Plate / Slicer: We call our slicer the “Build Plate”. Here you’ll upload or import STL/OBJ/3MF files and get them ready for printing.
Manage: More details on managing your printer down below in the “Manage” Printer Page section
Printer Name: If you’ve given your printer a name (Manage > Settings) that’ll be displayed here. You can also select from this drop down to switch between your different printers.
Print Queue
There are actions you can take on the many print jobs you and others have sent to the printer. Click the 3 dots in the top right of any job to see more.

When viewing a job in the printer’s queue, clicking the 3 dot menu will show you a list of actions you can take.
Run Estimator: Find out how long your print will take, and see how many grams (active subscriptions only)
Remove Job: Deletes the job from queue
Remove Job with Comment: Deletes the job from queue and allows you to send a message to the person (if not yourself) that submitted it
Change Printer: If moving this job to a different make/model of printer, it’ll ask you to re-slice the job for that printer type
Edit Job: Back to the build plate to make adjustments
Rename Job: Edits to the name only
Send job to Front / To Back: Moves the print job to front or back of the queue. If your print is in progress, you cannot move the job!
Download STL / Config / GCode File: Allows you to take the different parts of the print and download them to your computer
Manage Printer
The MANAGE printer page handles everything else that you might not need at your fingertips at all times. Here you’ll see:
Queue: A detailed view of the queue that shows more jobs than the printer dashboard page. No more scrolling!
Print History: If you’re a subscriber to the platform, we keep all of your prints in our secure database so you can come back to anything you’ve ever printed.
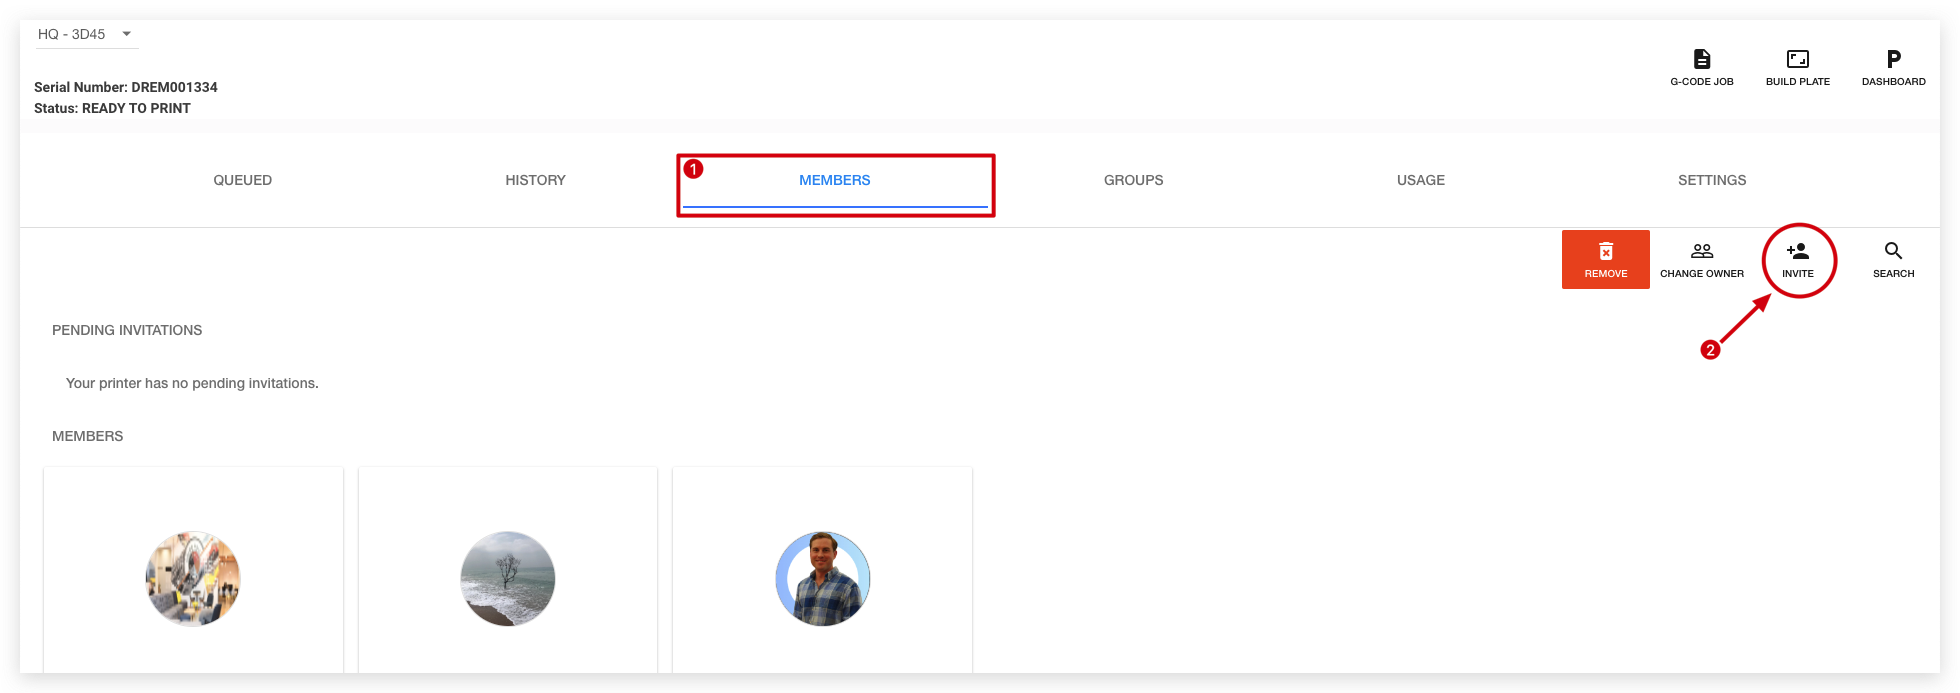
Members: Here you’ll share direct printer access (via invite, or email) with other cloud members of your choosing.
Groups: See the groups (or classes if you’re a teacher) that you’ve shared your printer with.
Usage: Detailed usage statistics about every print done on your 3D Printer.
Settings: Rename your printer, fill out more information, and learn about your printer in the settings page.

Sharing Printer Access
All steps below that you are manager or owner of the 3D printer. You cannot share the printer with others if you do not have the proper level of access.
1 Sharing Access Directly (One user at a time)
From your printer’s dashboard, click MANAGE
Click the MEMBERS tab
Click INVITE and then choose “Invite cloud members” and search for their Username (their public display name, not their email address)

2 Shared via Group / Class
Visit the group by going to Connect > Groups and clicking it to view the main Group page
Click the PRINTERS tab
Click SHARE, select a printer from the list and add it to the group!
All MEMBERS in the group will have access to the printers. There are some small changes you can make to the way that they use the group under the SETTINGS tab.

3 Shared via School
Activating a School and using its Site License to share access is the easiest way to allow others to view and use the 3D printers.
Visit your School’s Dashboard
Click the SETTINGS tab
Click “Add Printer” and choose from the list!
Your users will have view, view and queue, or managerial access, depending on what Join Code they use to join the school.
